ROCK LEGENDS II - RANDY RHOADS
Lesson Sample
Lyle: Combining
classical music with heavy metal guitar riffs and techniques was the signature
style of the late Randy Rhoads. From only two recordings with his original band,
Quiet Riot, and two with ex-Black Sabbath singer Ozzy Osbourne, Randy reached
legendary status in a very short time. Randy's brief time on this planet left a
mark on every guitar player who wanted to be a metal
guitarist. He favored Gibson Les Paul custom
guitars as well as the Jackson "V" or "Randy Rhoads" signature model guitars
that he helped design. He used a heavy distortion sound and
many times for the studio recordings he double tracked all his parts to make
them bigger sounding. For your live sound, try adding a slight delay, about 75
to 100ms with no extra repeats.
Lyle: The first part of the lesson sample
starts with a solo classical guitar piece I wrote in his style. Your right hand
will be finger picking the strings, just like a classical guitarist
would.
Lyle: This is in the key of B
major. I've broken it into 4 riffs to make it
easier for you to learn. Here we go!
Lyle:
Once I have all 4 riffs up, I'll send you a movie of me playing all 4 parts
together.
Lyle: The virtual guitar neck will show you
what fingers to use on your left hand. Here's the next
riff:
surista: Are
you barring the E-B-G-D strings with index finger?
Lyle: Yes, your 1st finger is held down to
play those strings at the 9th fret.
Lyle:
Here's the final riff:
Bee -
movie
Lyle:
As you learn the tabs for all 4 riffs, notice that it's all in the key of B
major and you're using the 1 - 4 - 5 chords, B - E - F# to make the
song.
Lyle: Classical part is done, just 4 simple
riffs using only 3 basic chords! After you have memorized all 4 riffs,
try playing along with me using this jam track:
Bee - play
along

Lyle: Let's move into the next part
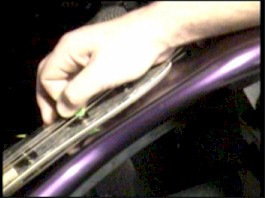
of the lesson, the metal rock style! The palm-muting technique is a key
element in the heavy metal style. Using this technique will help you achieve a
tighter, more percussive sound. Simply rest your picking hand on the
bridge and use the heal of your hand to slightly mute the bass strings. Here's a video clip showing
where to put your hand.
palm mute example
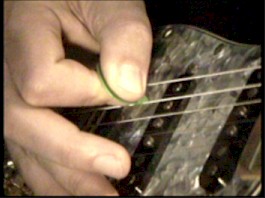
Lyle: Hold your pick tightly and while you're
muting the string, strike hard with your pick.
pick grip
1

Lyle: I suggest you angle the pick downward as
you pick down and up. Here's another view of how I hold the pick for palm
muting. Notice in the pictures and video clip
how the heal of my hand covers the
bridge. The pick is actually somewhat sideways
not flat, angled down.
pick grip
2

Lyle: Take a listen to this next riff, now in
the key of Em, which uses the palm muting technique:
rhythm riff
1
Lyle:
Notice the sound
of the note that is bent up on the 3rd fret, it has that high squeal
sound to it. This is done by
laying the edge of the pick down on the string along with the edge of your
thumb. When you strike
the string with your pick, the edge of your thumb touches the string too
creating a harmonic, high pitched note. The technique is often called a "pinched
harmonic". Here's a close-up video of this
technique:
pinched harmonics
Lyle: You are going to
learn 4 rhythm riffs and put them all together. This is the section from the
lesson sample between the classical intro and the solo.
Lyle: You just learned riff 1, here's riff
2:
rhythm riff 2
Lyle:
The next riff moves up a string to the A chord and has a Randy signature riff at
the end, a real fast pull-off riff.
rhythm riff 3
Lyle:
Here's a close up video of the fast pull-off riff:
pull-off
riff 2
Lyle: Here's the 4th riff of this
section, it has a cool riff in the middle of it. It's an arpeggio, a diminished
arpeggio with a pinched harmonic at the top note.
rhythm riff 4
remy: What effects do you have with that
pinched harmonic?
Lyle: I'm using a slight delay
effect, 75ms and 100ms.
Lyle:
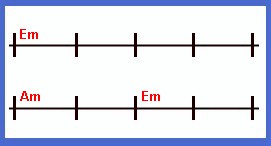
Here's a chord chart of how all 4 riffs go together:
chord
chart - rhythm riff 1

Lyle: Use this jam track to play all 4 rhythm
riffs along to:
jam track - rhythm part 1

Lyle: So really, the lesson sample
from the top of this lesson has just 3 parts to it. The classical intro, the
middle rhythm section you just learned, and the solo section on the
end.
Lyle: The solo section has a unique guitar
part to it that I picked up from learning Randy's riffs years
ago. It doesn't use the standard power
chords. You'll see in this next tab. This is for
the rhythm guitar part behind the solo:
rhythm riff -
solo
Lyle:
Here's a jam track for the solo section:
jam track - solo section
Lyle:
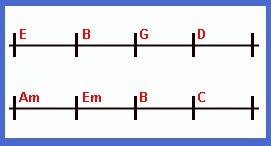
The chord chart for this section looks like this:
chord chart -
rhythm riff 2

Lyle: This chord progression of the song is
from a tune I wrote years ago called "Bach 'n A". I was inspired by Randy as
well as many other guitarists. Randy used arpeggios many times on
solos, sometimes briefly, sometimes to create the entire
solo. An arpeggio is the basic notes of a
chord played one at a time. Most of the time, just 3 notes are
needed to make "the triad" of the chord, 1 - 3 - 5. Examine the chord progression, then
examine the solo riffs. Here we go:
Lyle:
Each note is picked using alternate picking. There are no hammer-ons or
pull-offs. You pick each note hard to create a louder sound that will cut
through the mix.
solo
Lyle: Once you learn the solo, you can use the
last jam track I sent to play it over.
Lyle: Here's a jam track that has the whole
song in it minus the classical intro:
jam track - full version
Lyle:
That's all for this lesson. If you are interested in
learning more guitar riffs in this style or even some of the songs by Ozzy and
Randy, you can in a private lesson with me just like in this lesson. Contact me
for more info at: Lyle@theguitar.net
Thanks - Lyle
