Scroll through the lesson and click on notation/video/audio links to load the interactive players.
Please subscribe to get full access to all lessons for only $7.95/month PLUS 1 week free trial.

Riff Interactive lessons are
LESS expensive and
MORE interactive than alternatives!
More Info
|
|

Beginning Guitar
II - Lesson 3
5 Basic Chords You Should
Know
Lyle: In the past few lessons you learned simple
1 finger chords. Now it's time to learn some real chords!
Lyle: This lesson is about the 5 basic chords you
should know; A, C, D, E, and G. These 5 chords when played down in the open
position all have unique shapes to them that you'll use later on to play what's
called "moveable bar chords"
all over the neck. The main thing to do in this lesson is to get good at playing
these chords, memorize their name, their sound, and their
shape. These 5 chords are used in thousands and thousands of songs.
Lyle: Here's
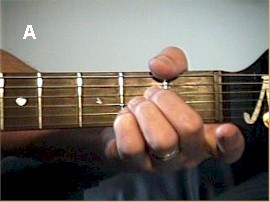
the first chord - A. You can use your 1st, 2nd, and 3rd fingers to play it or
use your 2nd, 3rd, and 4th fingers just like I do. Strum 5 strings, mute the 6th
string with your thumb:
A chord
A chord
Lyle:
Make sure each of the notes in the chord ring clearly. The circled note
(highlighted) is the root note, A.
Lyle: Now try strumming the chord like this. Hit
the root note on beat one, then strum the rest of the chord for beats 2, 3, and
4:
A chord rhythm
pattern
A chord rhythm
pattern
Lyle:
Use all down strokes. Play the A chord like I did in the video. You can loop the
TAB file so you can play along with me. Notice in the TAB file you can hear me
counting out loud the beats, try doing this with me too.
Lyle: Here's a plain drum beat you can use to
play along with too:
Jam Track - just drums
Lyle: That is the A major chord played
in the "open position" meaning down low on the neck and with open
strings.
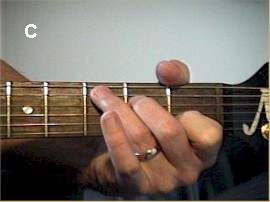
Lyle: Next it's time to learn the C chord in the
open position:
C
chord
C chord
Lyle:
The root or bass note for this chord is third fret, third finger, 5th string.
Try using the same strum pattern you did with the A chord like
this:
C chord
rhythm pattern
C chord rhythm
pattern
Lyle:
Remember, you can loop the TAB file to play along with me, and you should count
out loud with me too.
Lyle: Now let's play these two chords in a
progression. Each chord will get two measures, then you switch like
this:
chord
progression 1

chord progression 1
chord progression
1
Lyle:
You can use the looping jam track of just the drum beat to practice playing this
progression. Keep repeating it over and over until you can make the changes real
smooth and stay on the beat. Count out loud which helps most of the
time.
Lyle: Notice the A and C chords have unique
shapes to them. Visualize the shapes and fingerings to help you memorize
them.
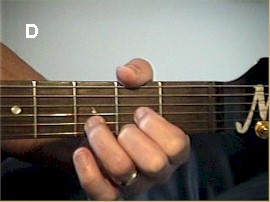
Lyle: The next chord is the D
chord:
D
chord
D chord
Lyle:
This chord has the root note, D, located on the 4th string, the D string. If you
were to do the same rhythm pattern as the other chords, you would need to start
by plucking the 4th string like this:
D chord rhythm pattern
D chord rhythm
pattern
Lyle:
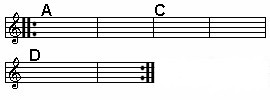
Now try this progression, A to C to D then repeat:
chord progression 2
chord progression 2
chord progression
2
Lyle:
Once you can play these three chords as in chord progression 2, it would be time
to learn the 4th chord of the lesson, the E chord.
E chord
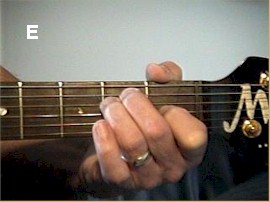
E chord
Lyle:
Here's the rhythm pattern for the E chord which has the root located on the 6th
string:
E chord
rhythm pattern
E chord rhythm
pattern
Lyle: Notice each chord has it's
own unique shape.
Lyle: Now try playing all 4 chords together in
this progression:
chord progression 3
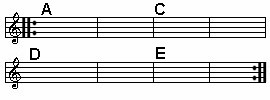
chord progression 3
chord progression
3
Lyle: I'm having you use this rhythm pattern to
help you memorize the root note for each chord.
Lyle: The 5th chord for you to learn is the G
chord in the open position. There can be two different fingerings for this
chord:
G
chord
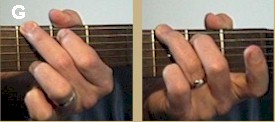
G chord
Lyle: I
like using the 1st, 2nd, and 3rd fingers to make this chord...most of the time.
When you have to play a song that goes from G to C to G to C all the time, then
I would use the other fingerings because it makes it quick and easy to switch
back and forth.
Lyle: Here's the same rhythm
pattern:
G chord
rhythm pattern
G chord rhythm
pattern
Lyle:
Now you're ready for the big time! Let's try playing a progression that uses all
5 of these chords in order like this:
chord progression 4 - all chords
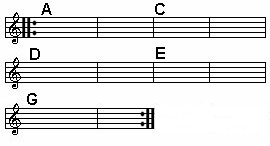
chord progression 4 - all chords
chord progression
4 - all chords
Lyle:
Each chord gets two measures then repeat. Here's a jam track that has "the band"
playing this progression. You should keep practicing until you are able to play
with the band several times over and not miss a beat!
Jam Track
for progression 4 - all chords
Lyle:
You will be using these 5 chords forever so get good at them now! All of these 5
chord shapes will play a very important role for you when learning how to find
other chords all over the neck. We'll get to that later. Get good at these now!
Let me know if you have any questions or you would like me to help you play your
favorite song, email me at Lyle@theguitar.net. Thanks,
Lyle
|
<< load notation from left
|
|
<< load audio from left
|
<< load audio from left
|