
Picking Patterns - part 1
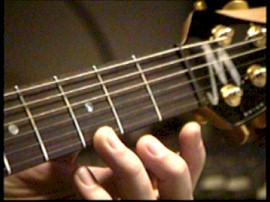
Lyle: Here's a simple way to play a G chord
using just 3 strings and one finger. Place your 3rd finger on the 3rd fret of
the 1st string:
G
Lyle:
There are many ways to play the G chord, this is the simple way.
Here is a basic picking pattern for you to learn.
You'll use 4 strings starting on the D (4th) string and pick down until you get to the 1st string,
then pick up on the first string.
Lyle: Here's a looping jam track you can
play along to:
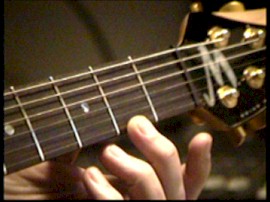
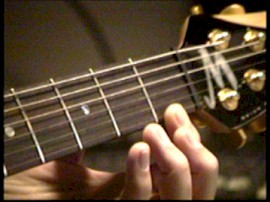
Lyle: Now you'll learn two more chords that
are almost the same as the simple G chord:
Gmaj7
G7
Loki: When learning to pick, what is the best technique, using your thumb, a pick, or picking with your thumb and three fingers?
Lyle:
I like to use both techniques,
right now use your pick, I'll talk about finger picking in a minute.
Lancer:
Gmaj7 is different than G7.....
Lyle:
Yes Lancer, by one note, or one fret.
Lyle:
Now you should have 3 chords: G, GMaj7, and G7.
Make sure you're using your 3rd finger for G,
2nd finger for GMaj7,
and 1st finger for G7.
Lyle:
Here's a tab file for you to learn,
it uses all three chords in a progression.
Lyle: Here's a sample of me playing along to the jam track.
Lancer: Is it important to pick upward on the high
E/1st string?
Lyle:
Yes Lancer, that way your right hand is coming "back" and getting ready to start again.
peter2: When I use hybrid picking, the notes I hit with the pick sound louder than the ones
I hit with the fingers, is it wrong?
Lyle: It's a matter of pick and finger control,
a dynamics issue. Try to even and smooth out the strength you're using when
hitting each note.
Lyle:
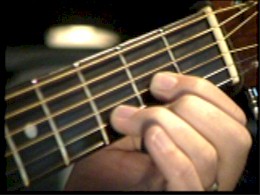
Ok, on to another chord, D. This uses 3 fingers:
D
Lyle:
Notice in the tab example, I "arpeggiate" the chord,
or pick one string at a time to make sure all notes are ringing clearly.
Lyle:
Here's a picking pattern like the one you used for the G chords, now use it for the D chord.
Lyle:
Here's a video clip of this technique.
Lyle:
Here's an audio sample for you to listen to.
Lyle:
You'll pick down until the 1st string, then pick up.
Lyle:
Finger picking is another fun technique to learn.
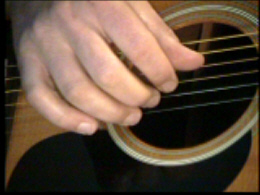
For the D chord, place your thumb on the 4th string,
index finger of your right hand on the 3rd string,
middle finger on the 2nd string,
and 3rd finger on the 1st string. Check out the picture and video clip.
right hand fingers
Smitty:
Thumb on 4th???
Lyle:
Yes Smitty
Lyle: Here's a new jam track for the D
chord picking:
ken: Is anchoring the pinky on the pick guard a good idea?
Lyle:
Ken, yes, very good point! When you use a pick, anchor your wrist with your right
hand pinky.
Lyle:
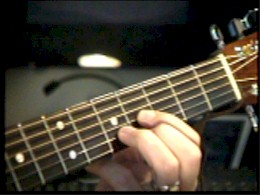
Let's add a second chord by sliding the D up 2 frets. It's called E over D, which means E chord over a D bass note. Transcribed as E/D.
EoverD
Lyle: You can use your fingers like I described a few minutes ago, or use a pick.
ken: Producing a clean pick sound with the meat of your finger is somewhat difficult.
Lyle:
Ken, if your right hand finger nails are longer, you can produce a sharper tone and attack.
Lyle:
Learn this first lick and play it in time with the jam track. It uses D and E/D with our picking pattern. The open D string drones for both chords.
Lyle: Here's an audio sample of me playing
lick 1 over the jam track:
Smitty:
Is g/d the next logical step after e/d???
Lyle:
Smitty, yes but don't forget F!
ken: How important is using a metronome when arpeggiating chords?
Lyle:
ken, it's always a good idea to practice to a drum beat or metronome,
that's why I send up looping jam tracks for you to practice to.
Lyle:
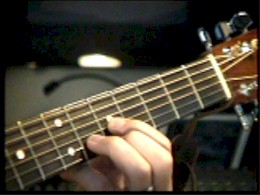
Here's F over D or F/D. This is only 1 fret higher than the E chord, 3 frets higher than where you started at the D chord.
FoverD
Smitty: When you said don't forget the F after the e/d, are we in the key of G or D. (is
the F the b7 in G or b3rd in D?
Lyle: We've switched to the key of D.
Smitty:
So F would be a b3rd??
Lyle: Yes.
Ron: You can move a chord with an open string?
Lyle: Yes Ron. Some chords you can, you'll learn more of those in upcoming lessons here.
ken: Is it best to pick with the skin of the finger or the finger nail?
Lyle: Depends, you can get different dynamics
and tones from each technique.
Loki: Is there a way to pick with your fingers
and get a clearer sound that isn't so quiet?
Lyle: Grow your right hand nails out a little,
that could help.
Lyle:
I'm giving you a few movable chords using the simple "open D shape".
I wanted to create a few simple chord progressions for you,
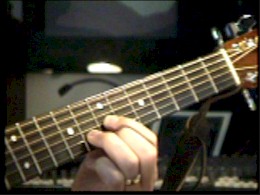
so that your right hand would get all the attention. Here comes the G/D chord,
just 2 frets higher than the F/D:
GoverD
lv8rdoc:
Is that a Guild?
Lyle: No, it's my
Martin HD-28.
Lyle: If you wanted to play the A/D chord, just move the G/D 2 frets higher.
Here's a tab file where you'll play the D, E, F and G chord together in a progression.
Lyle: Here's a sample of me playing lick 2 over the jam track.
Lyle: Remember, if you're using a pick,
go down, down, down, up.
Lyle: Lick 3 uses the A/D chord which is
just 2 frets higher than G/D, study the tab:
Lyle:
Now I'd like to introduce some changes for your left hand.
This is called a Dsus2 chord,
just like the D, but with an open 1st string.
Dsus2
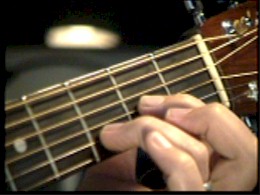
Lyle: And next is the cousin to the sus2,
the Dsus4 chord:
Dsus4
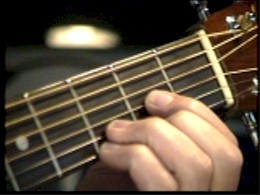
Lyle:
These are names of chords for you to memorize. Now you'll set your right hand in auto-pick motion and put you attention to your left hand with this next lick.
Lyle: Here's a sample of me playing it to the jam track.
Lyle:
Now try changing your right hand pattern to this sequence, you'll still start
off with your thumb on the 4th string of the D chord, then 1st string, 2nd
string and 3rd string:
Lyle: Next is lick 5,
it's the same as lick 4, only with the new picking pattern:
Lyle: These are all good basic exercises to
start with. That’s all for
this lesson. If you would like further study on this topic or any other topic,
email me at
Lyle@theguitar.net for info on how you can get your own customized guitar
lessons like this using Riff Interactive technology. Your private lessons can be
downloaded to your pc for anytime, anywhere study. Thanks and see you at the
next lesson. - Lyle
|
<< load notation from left
|