Scroll through the lesson and click on notation/video/audio links to load the interactive players.
Please subscribe to get full access to all lessons for only $7.95/month PLUS 1 week free trial.

Riff Interactive lessons are
LESS expensive and
MORE interactive than alternatives!
More Info
|
|

Slide Guitar for Beginners
Open Tunings - part
1
Lesson Sample
Teacher: When your guitar is tuned to an "open
tuning" this means you can strum all the strings open (without using any
fingers) to make a full chord. This is ideal when using a slide because the
slide acts as a bar when laid across all the strings enabling you to slide to
any chord without using your fingers on the frets.
Teacher: Let's start with our guitar in standard
tuning: E A D G B E. In order to change this to open G tuning
the strings must change to D G D G B D.
open G
tuning
Teacher:
The only strings that will be re-tuned are the sixth, fifth and first. The sixth
and first must both go down to a D note. You can do this by ear by comparing
these two strings to the fourth string. This string remains constant and will be
your guide. The first should end up sounding an octave higher than the fourth
and the sixth an octave lower. Now the 5th string needs to go down a whole step
to G. Match it up with the third string. Here's a video clip of all
this:
open G
tuning
Teacher: This lesson uses 3 chords; open G, C at
the 5th fret and D at the 7th fret. G can also be played at the 12th fret which
is one octave higher than the open G. I'm using acoustic tonight but you can use
electric too.
Chords
in Open G tuning
Teacher: When I began to make this
lesson up I used the traditional chord progression called the 1 - 4 - 5 in G.
Then I just played around with moving from chord to chord which is what you'll
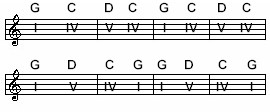
learn to do. Here's a chord chart for the first riff:
chord chart -
part 1

Teacher: You'll use this jam track with the first
riff:
jam track -
part 1
Teacher: Examine and learn the first riff. Notice
you're following the chord progression with the slide.
Note:
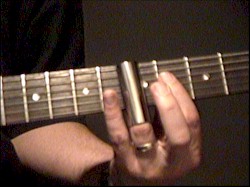
Make sure your slide is on top of the fret, not between them to be in
tune.
slide on top of fret

riff
1
riff 1
Teacher: Let's change the order of the 3 chords
to simply give us a new part. Here's the new chord chart and jam track. Notice
the order of the chord progression has changed slightly:
chord
chart - part 2

jam track - part 2
Teacher: This next riff follows new changes. It's
just like riff 1 but the order of chords are different and the first chord G is
played at the 12th fret:
riff 2
riff 2
Teacher: Try playing both riffs back to back.
Here's a chord chart of both progressions and a jam track:
chord chart - both
parts

jam track - both parts
Teacher: When you use an open tuning like this,
it's a good idea to make use of the strings that have been changed like the
first string. You can't get that sound with a slide in standard tuning. Notice
in riffs 1 and 2 you strike the first string in almost every
chord.
Teacher: I've got a couple variations for you to
learn for both chord progressions.
Teacher: This next riff can be used against
jam track - part 1.
riff 3
riff 3
Rich: Are you
using a pick or finger picking?
Teacher: I'm using a pick to get a louder sound
from my acoustic.
roy: Glass or metal slide?
Teacher: I like to use metal, I keep breaking the
glass ones.
roy:
I have small fingers, do they come in different sizes?
Teacher: roy, they come in all sizes,
jimdunlop.com is a good place to look at many different
slides.
Teacher: Here's another riff, this time it's the
alternative chord progression like you used in riff 2.
riff
4
riff 4
Teacher: If you play all 4 riffs back to back,
you'll be playing exactly what is in the Lesson Sample. Every 4 measures the
chord progression changes between the two different
patterns.
Teacher: If you're interested in customized
private lessons in any style, email me at Lyle@theguitar.net for more info. Thanks,
Lyle

|
<< load notation from left
|
|
<< load audio from left
|
<< load audio from left
|