Scroll through the lesson and click on notation/video/audio links to load the interactive players.
Please subscribe to get full access to all lessons for only $7.95/month PLUS 1 week free trial.

Riff Interactive lessons are
LESS expensive and
MORE interactive than alternatives!
More Info
|
|

Blues Guitar For
Beginners
Lesson 9
Lyle: In this lesson you'll be
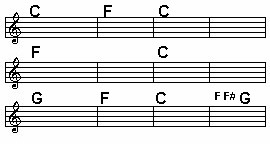
playing in the key of C. The three main chords for this typical 12 bar blues
progression in C are C, F, and G. These are the I - IV - V chords in the key of
C. You'll be playing near the middle of the neck for these chords which are made
from the simple power chord shapes:
Lyle:
Here's the main rhythm riff for the C chord:
Lyle:
For this rhythm riff make sure you're using the correct fingerings. Your index
and third finger is used for the 8th and 10th frets, your pinky/4th finger used
for the stretch up to the 12th
frets.
Lyle: This rhythm figure is 4 beats long, or 1
measure. To do this for the F chord just move it down 1
string:
slinger: I need a pinky
extender!
kyla: Me
too...
Michael: Try putting your thumb behind the neck even with
your middle finger.. your pinky should reach then.
Lyle: If you're having trouble reaching the 12th
fret with your pinky, drop your wrist down and away from you. This will extend
your finger reach. See video of the rhythm riff and notice my wrist
position.
Lyle: To make the G chord rhythm riff, move UP
two frets from the F position:
Lyle:
You'll only need to use these three chords and rhythm riffs to play the whole 12
bar blues progression in C. But there is one more thing, the turnaround riff.
The last two measures of a blues progression has the basic turnaround riff that
signals the end of the progression and gets you "turned around" to start over
again. Here it is:
Lyle:
Here's the whole progression using these rhythm riffs:
danman: That is
easy.
Jorge:
It's easy but fundamental.
Lyle: Once you have the full rhythm riff figured
out, try playing along to this looping jam track:
chord
chart

Lyle: Let's learn a couple blues riffs to
play against the jam track. The best scale to use is......the C minor pentatonic
scale. Here's a cool pattern to learn:
Lyle:
The "minor pentatonic" scale is a five tone scale made from the root, b3, 4, 5,
and b7 degrees of the major scale.
Lyle: Learn to play that scale pattern just like
I tabbed out. It has a good sound to it.
Lyle: Notice the highlighted notes are the root
notes, in this case C.
Lyle: Here's a blues riff that uses 4 notes and 4
strings. Two basic techniques are used, a slight bend, and a vibrato, just like
in the past lessons.
Lyle:
Notice this riff is made from notes right in the C minor
pentatonic.
Lyle: The strong vibrato helps sustain the note
longer too.
Lyle: The next riff uses a legato slide from the
10th to the 12th frets on the third string. Only strike the 10th fret then slide
to the 12th fret. You don't strike the 12th fret, just let it
ring.
jeff: Is it
better to pull down on riff 1?
Lyle: The last two notes are to be ringing out
together. You'll also need to add a vibrato to them. This is tricky. It's a
certain vibrato technique used by violinists. Instead of bending or wiggling the
strings, you pull and push them back and forth. Here's a video
example:
MarkW:
what does legato mean?
Lyle:
Jeff, it's easier to pull down on the note in riff 1.
Lyle:
LEGATO SLIDE: Strike the first note and then slide the same fret-hand finger up
or down to the second note. The second note is not struck.
Lyle:
Now you can make a simple solo using these two riffs. Play riff 1, then riff 2,
then riff 1 again like this:
jeff: This is a
great lick!
danman: This is
cool.
Lyle: Here's a video of
it:
Lyle:
This is how I played the solo in the lesson sample above. I played it just like
this:
Lyle: All I did was play blues riff
1, then blues riff 2, then blues riff 1. Then I started over. I listened to the
jam track to kind of find my way as to when I would start the next
riff.
len: In riff 1 when you hit the 1st three strings,
are you rolling or jumping your finger real fast?
Lyle: Len, in riff 1 you'll roll your index
finger on the first three notes. Try not to bar them.
kyla:
sounds cool when you play riff 2
backwards
Lyle: Yes and that's a good idea, to try
different ways to make new blues riffs from old blues riffs. Your goal in this lesson is to be able to
play the rhythm along to the jam track, and to play the solo too, just like in
the TAB.
Lyle: Well that wraps up this
lesson. See you in the next lesson!
|
<< load notation from left
|
|
<< load audio from left
|
<< load audio from left
|